Basic Relay Sockets: Principle, Types & Key Specifications
Introduction: Relay sockets are fundamental components in electrical control systems, providing a convenient relay socket base or holder that allows electromechanical relays to be easily plugged in and replaced without soldering. Understanding the relay socket principle (i.e. how these sockets work and interface with relays) is crucial for anyone looking to ensure reliable connections and compliance with relay socket standards in their projects. In this article, we delve into the relay socket working principle, explore various relay socket types and categories, examine key relay socket specifications (such as voltage, current, and materials), and discuss proper relay socket installation and connection methods. We’ll also highlight design features, relay socket dimensions, and durability considerations, and provide guidance on relay socket selection to help you choose the right socket for your application. By the end, you’ll have a comprehensive understanding of relay socket functionality and characteristics, enabling you to make informed decisions and ensure safe, efficient operation in your electrical systems.
TL;DR
- What is a Relay Socket: A relay socket (or relay base/holder) is a connector that a relay plugs into, simplifying relay installation and replacement. It securely holds the relay and routes each relay pin to external circuit connections, providing a convenient interface without direct soldering.
- Types & Categories: Relay sockets come in various types based on mounting and design – e.g. DIN rail relay sockets, PCB mount sockets, panel-mount sockets, and automotive relay sockets. They support standard pin configurations (commonly 5, 8, 11, 14 pins, etc.) and different terminal styles (screw terminals, quick-connect blades, solder pins, etc.) to suit different applications.
- Key Specifications: Important specifications and characteristics of relay sockets include the rated voltage and current they can handle, the number of poles or contacts supported, insulation resistance, dielectric strength, and temperature range. Quality sockets use robust materials (flame-retardant plastics, copper alloy contacts) for durability, and many comply with international standards like IEC 61984 and UL 508 for safety.
- Installation & Connection: Proper relay socket installation involves choosing the right mounting style (snap onto DIN rail, screw to panel, or solder to PCB) and using the appropriate connection method. Relay socket connection methods vary – screw clamp terminals and spring-cage terminals for wiring, or solder pins for PCB mounting are common. Secure mounting and correct wiring ensure reliable relay operation and make maintenance easy.
- Selection Tips: To select the right relay socket, match the socket to your relay’s pin layout and ratings. Consider the relay’s coil voltage and contact current – the socket must support those electrical loads. Account for environmental factors (vibration, temperature) and look for durable design features (like retaining clips or optional LED indicators). Always check that the socket meets relevant standards and fits the physical dimensions of your relay. Choosing a high-quality, compatible socket guarantees safe, long-lasting performance.
Understanding the Principle and Functionality of Relay Sockets
A relay socket is essentially a connector base for a relay, designed to make relay usage more convenient and reliable. How does a relay socket work? In principle, it provides a set of conductive contacts (terminals) that correspond to each pin of the plug-in relay. When you insert the relay into the socket, each relay pin slides into a matching socket contact, establishing an electrical connection to the circuit. The relay socket functionality is passive – it doesn’t alter the relay’s operation, but it securely mounts the relay and electrically links it to external wires or a printed circuit. The basic relay socket working principle is to act as an interface: on one side it accepts the relay’s pins, and on the other side it offers convenient terminals (such as screws or solderable leads) for connecting to your system’s wiring.
Using a relay socket offers significant practical benefits. It simplifies installation and replacement of relays: instead of soldering a relay directly or wiring it in-line (which can be tedious and risk damage during replacement), you can plug the relay into the socket. If the relay fails or needs swapping, you simply pull it out and plug in a new one – the wiring remains intact on the socket. This saves time and effort, especially in industrial settings where downtime needs to be minimized. The socket also provides a stable mechanical mounting, often with clips or retainers to hold the relay firmly (preventing it from vibrating loose in high-vibration environments). In essence, the relay socket principle centers on making relays modular components of a system, improving maintainability and safety.
Moreover, relay sockets help standardize connections. Many sockets have numbering or labeling for each terminal corresponding to the relay’s coil and contact terminals (for example, common terminal, normally open, normally closed, coil terminals, etc.), according to industry conventions. This ensures correct wiring and easier troubleshooting. Functionally, the socket does not change how the relay’s coil activates the contacts; it simply provides an efficient pathway for the electricity to flow from the relay to the rest of the circuit. By using robust conductive contacts and insulating housing, a good socket maintains low contact resistance and secure connectivity throughout the relay’s operation.
Key Takeaways:
– A relay socket is a specialized connector that a relay plugs into, acting as a base or holder for the relay.
– It interfaces each relay pin to external circuits, allowing easy relay installation and replacement without re-wiring.
– The socket’s principle is purely connecting and holding – it simplifies maintenance and ensures reliable contact, but doesn’t alter the relay’s electrical function.
Learn more about the basics in our guide to Electromechanical Relays (internal link).
Types and Categories of Relay Sockets
Relay sockets come in a variety of types and categories, each designed to accommodate different relay packages and mounting methods. The first way to classify relay sockets is by their mounting style:
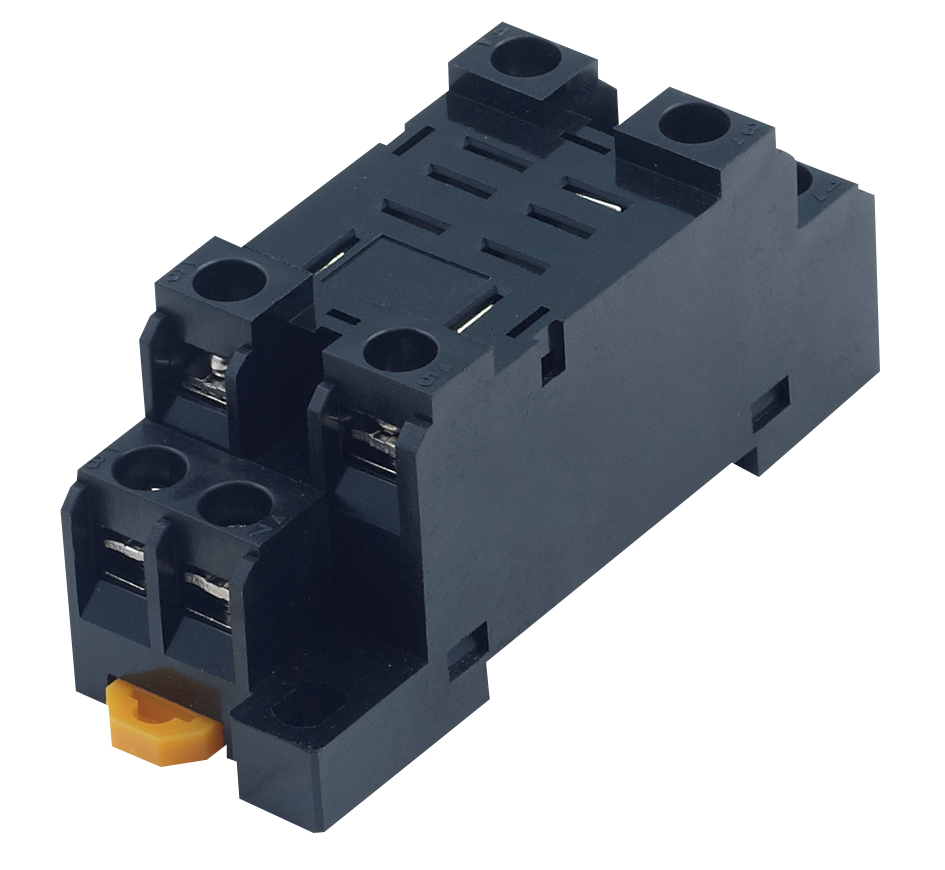
- DIN Rail Mount Sockets: These sockets clip onto standard 35 mm DIN rails commonly used in industrial control panels. They often feature screw or spring-clamp terminals for wiring. DIN rail relay sockets allow quick installation and removal in modular panel setups. Many industrial plug-in relays (with 8-pin or 11-pin bases) use DIN rail sockets.
- Panel/Chassis Mount Sockets: These have flanges or holes so you can screw them directly onto a panel or enclosure. Panel-mount sockets provide a secure fixed position for the relay. They may have wire leads or screw terminals for connections. This category might also include through-panel mount types, where part of the socket extends through a cutout.
- PCB Mount Sockets: These are designed to be soldered onto a printed circuit board (PCB). They typically have solder pins or through-hole leads that go into the PCB, allowing a relay to be plugged into the board. PCB relay sockets are common for smaller relays or where the relay is part of a circuit board assembly (e.g. in appliances or control modules).
- Plug-in Harness/Automotive Sockets: Used in automotive or wiring harness contexts, these sockets often come with attached wires or crimp contacts. For example, the automotive relay socket for a 4-pin or 5-pin car relay has molded plastic housing with wire leads. They may include features like locking tabs or weather-proof covers for vehicular use.
Another way to categorize relay sockets is by the relay package and pin configuration they support. Relay socket types are usually defined by how many pins (or blades) the relay has and the arrangement of those pins. Common relay socket pin configurations include 5-pin, 8-pin, 11-pin, 14-pin, etc. For instance, an octal relay socket refers to an 8-pin circular layout (often used for general-purpose tube-shaped relays), while an 11-pin socket is slightly larger diameter with 11 contacts (often for multi-pole relays or timers). There are also rectangular blade-type sockets for cube-shaped relays that have flat blades instead of round pins. Examples of socket receptacle styles are: octal (circular) sockets, blade or lug sockets (for flat blade relays), and square sockets for cube relays. Some miniature relay sockets with very small pin layouts are sometimes called “midget” sockets in industry jargon.
Each socket type is generally compatible with a range of relays that share that pin configuration and size. Manufacturers often produce relay families alongside matching sockets. It’s important to select a socket that matches both the pin arrangement and the dimensions of your relay (including any keying or indexing that prevents wrong orientation). For instance, PCB relay sockets might be low-profile and only fit specific relay models, whereas DIN rail sockets for industrial relays are somewhat standardized so they can accept relays from different brands as long as the base pin layout follows standards.
Finally, relay sockets can be categorized by their terminal connection method (which ties into mounting too). Screw terminal sockets have screws that clamp down on inserted wires (common in DIN rail and panel sockets). Spring-cage or push-in terminal sockets allow you to push a wire in to make contact (these are finger-safe and quick to connect, used in newer industrial designs). Solder pin sockets are for PCB types as mentioned. Quick-connect tab sockets might have flat tabs for faston connectors or crimp terminals. These different connection methods provide flexibility in how the socket is wired into the circuit (we will discuss connection methods further in the next section).
Key Takeaways:
– Relay sockets are classified by mounting style: e.g. DIN rail mount, panel mount, PCB mount, or free-hanging automotive harness types. Choose a style that suits your installation (panel vs. PCB vs. rail).
– Sockets also differ by pin configuration and shape – common categories include 5, 8, 11, or 14-pin bases (round or square). Standardized styles like octal (8-pin) sockets and blade-type sockets correspond to particular relay types.
– Terminal types (screw clamps, push-in, solder pins, etc.) vary by socket design. This affects how you connect wires to the socket and can be chosen based on convenience and application.
Learn more in our detailed overview of PCB Relay Sockets and Parameters (internal link).
Specifications, Standards, and Key Characteristics
When choosing or working with a relay socket, it’s important to understand the key specifications and characteristics that define its performance. The main electrical ratings to look at are the voltage and current ratings. The relay socket voltage rating indicates the maximum voltage the socket’s insulation and design can safely handle without breakdown. This is typically given as an AC and/or DC voltage (for example, “300 V AC” or “600 V AC/DC”). Using the socket within this voltage ensures it won’t arc or cause insulation failure under normal operation. The relay socket current rating is the maximum current the socket’s contacts can carry continuously. For instance, a socket might be rated for 10 A or 15 A per contact. Exceeding this can lead to overheating of the socket terminals or loss of contact integrity. Always ensure the socket’s ratings meet or exceed the requirements of the relay and circuit (if a relay’s contacts will switch 8 A, the socket should comfortably handle at least that 8 A on those pins).
Another important specification is the number of poles or contacts the socket accommodates (often implicitly set by the pin count and the relay type). For example, a “4PDT relay socket” means it can connect a four-pole double-throw relay (which typically has 14 pins including coil). Insulation resistance and dielectric strength are characteristics indicating how well the socket’s insulating material separates the contacts and prevents leakage or arcing. Dielectric strength is usually tested by applying a high voltage between contacts to ensure no breakdown. Temperature range is also specified – a quality socket will tolerate a broad range (e.g. -40°C to +85°C or more) so it can be used in harsh environments.
Mechanical specifications include the socket’s dimensions and form factor, which must match the relay. Many sockets adhere to standard dimensions or footprints (for instance, the IEC standardized octal base size). The relay socket design and build material heavily influence its durability and safety. Most sockets use a thermoplastic or thermoset polymer housing (such as nylon, phenolic, or polycarbonate) that is flame-retardant and provides electrical insulation. Some heavy-duty or high-temperature sockets might use ceramic or a composite material for the base. The contacts are typically made of copper alloys (brass, phosphor bronze, etc.) often plated with tin or nickel, and high-end versions may use silver or gold plating on contacts for better conductivity and corrosion resistance. These material choices affect the socket’s durability: for instance, a tin-plated contact might only endure a limited number of insertions and withdrawals before wear, whereas a thicker noble metal plating can sustain many more cycles[7]. Cheap connector contacts may last only 10–50 mating cycles, whereas quality sockets with robust contact materials can handle hundreds of cycles of relay insertion/removal without significant degradation.
Beyond basic ratings, many relay sockets are designed to meet international standards and safety certifications. For example, a good industrial relay socket often complies with IEC 61984, the IEC standard for electrical connectors (ensuring the socket’s design is safe for given voltage/current) and is tested under UL 508 (the UL standard for industrial control equipment) or related UL/CSA standards. These standards verify that the socket can handle things like flammability, insulation, and mechanical strength. It’s wise to check for markings like UL Recognized, CE, or IEC compliance on the socket, especially if your application must meet regulatory requirements. Additionally, sockets might carry an IP rating if they include any enclosure (though most open-frame sockets are used inside control boxes, some relay modules have IP-rated housings).
Finally, consider special features that some relay sockets offer as part of their specifications. For instance, certain sockets have built-in surge suppression components (like a diode or RC network across the coil terminals) or an integral LED indicator that lights when the relay coil is energized. Others might have a mechanical ejector or retaining clip to easily remove the relay or secure it firmly. These features can be very useful: an LED indicator on the socket lets you quickly see if a relay coil is being powered, and a retaining clip ensures the relay doesn’t vibrate loose. While these are not standard on all sockets, they are aspects to note in the datasheet.
Key Takeaways:
– Pay attention to electrical ratings: the socket’s maximum voltage and current must meet your system’s needs. Staying within these ratings prevents arcing or overheating.
– Key characteristics include insulation strength, number of poles supported, and environmental ratings (temperature, etc.). Materials (housing plastic and contact metal) determine flame resistance and lifespan – look for flame-retardant, shatterproof construction for durability.
– Choose sockets that comply with standards (e.g. IEC 61984, UL 508) for quality assurance. Consider any extra features like LED indicators or hold-down clips that can enhance functionality.
For deeper insight, read our guide on Relay Socket Standards and Specifications (internal link).
Installation and Connection Methods
Proper relay socket installation is crucial for both electrical performance and safety. The process and considerations will depend on the socket type and the environment in which it’s used. Here, we outline how to mount and connect relay sockets in various scenarios, and the best practices for each connection method.
Mounting the Socket: Start by securing the socket in its intended location before inserting the relay. For a DIN rail relay socket, hook the socket onto the rail and snap it in place (many have a spring clip mechanism). Ensure it’s firmly latched and cannot slide on the rail unless you release the clip. If you’re using a panel-mount socket, position it at the desired spot on the chassis or panel and use the appropriate screws or bolts through its mounting holes to fix it. Make sure to tighten it so it doesn’t wobble, but don’t over-tighten to the point of cracking the housing (especially plastic sockets). For PCB sockets, the installation is done during PCB assembly – the socket’s pins are soldered onto the board’s solder pads. It’s important in that case to ensure the socket sits flush on the board and the solder joints are solid. If the socket is tall or heavy, sometimes a bracket or additional support may be used to secure it to the PCB or chassis, particularly if the relay to be plugged in is large (to avoid stress on solder joints).
Connecting Wires to the Socket: Once the socket is mounted, you’ll connect the circuit wiring to the socket’s terminals. Relay socket connection methods vary:
- For screw terminal sockets, strip the wire ends (typically 6–7 mm of insulation) and insert each wire into the designated terminal (which is usually marked with the corresponding relay contact number). Tighten the screw firmly to clamp the wire. It’s good practice to use ferrules on stranded wire for a more secure connection in screw clamps. After tightening, give a gentle tug on the wire to ensure it’s clamped well.
- For sockets with spring clamp (push-in) terminals, push the stripped wire into the slot; the spring will grip it automatically. To release or re-wire, there is usually a push-button or lever to disengage the spring. These connections are fast and vibration-resistant (common in finger-safe DIN rail sockets). Ensure the wire is fully inserted – you might feel it hit the backstop inside.
- If using a quick-connect tab style (common in some panel-mount or automotive sockets), the socket terminals might be flat blades. In this case, you attach wires via mating push-on connectors (spade lugs). Crimp appropriate female spade connectors onto your wires and then slide them onto the socket’s tabs. Make sure the connectors fit snugly so they won’t slip off due to vibration. It’s also important to insulate any exposed metal if the socket isn’t already insulated, to prevent shorts.
- For PCB relay sockets that have been soldered onto a board, the “connection” is actually the PCB traces – so ensure the PCB design routes the correct nets to the correct socket pins corresponding to the relay’s coil and contacts. Double-check orientation so that coil pins on the relay map to coil pads on the PCB, etc. During assembly, inspect solder joints for completeness (no cold solder joints or shorts between pins).
No matter the method, always follow the wiring diagram provided by the socket or relay manufacturer. Typical numbering for industrial relay sockets (per standards like IEC or the manufacturer’s convention) might label coil terminals as A1, A2; common contacts as COM, normally closed as NC, normally open as NO (or numerical schemes like 11-14 for one contact set, etc.). Ensuring correct wiring to these labeled terminals is part of proper installation.
Securing the Relay in the Socket: After wiring, insert the relay firmly into the socket. Align the relay’s keying (if any) to the socket – many sockets have a notch or asymmetric pin layout that ensures the relay can only go in one way. Press down until the relay fully seats. If the socket has a retention clip or spring, engage it over the relay to lock it in place. This is particularly important for installations subject to vibration or movement (for example, on machinery or vehicles). A secure relay will maintain good electrical contact with the socket pins and not come loose over time.
Inspection and Testing: Once installed, it’s wise to do a quick check: verify that all connections are tight, no stray wire strands are shorting adjacent terminals, and the relay is properly seated. You can test the coil by energizing it and observing if the relay operates (many relays have a mechanical indicator or you can listen for the click). If your socket has an LED, it should light when the coil is powered, confirming the wiring to coil terminals is correct. Also, confirm that the load devices connected to the relay’s contacts behave as expected when the relay switches – this ensures that you wired the correct terminals (NO vs NC, etc.).
By following proper installation steps, you ensure that the relay socket will provide a reliable connection throughout the relay’s service life. Poor connections (loose screws, half-inserted wires) are a common cause of overheating or intermittent issues, so taking care at this stage pays off in long-term reliability.
Key Takeaways:
– Mount the socket securely according to its design (snap onto DIN rail, screw to panel, or solder to PCB) before inserting the relay. A stable mounting prevents mechanical stress on connections.
– Connect wires using the appropriate method: tighten screws firmly for screw terminals, fully insert wires in push-in clamps, or properly crimp connectors for tab terminals. Match each wire to the correct labeled terminal to avoid miswiring.
– Secure the relay in place with any provided clips or retainers after plugging it in. Always double-check connections and perform a functional test to ensure the relay and socket are wired and working correctly.
Check out our Relay Installation and Wiring Guide for detailed best practices (internal link).
Design, Materials, and Durability Considerations
The design and materials of a relay socket determine not only its basic function but also its longevity and suitability for various environments. A well-designed relay socket will use quality materials that ensure electrical reliability and mechanical strength over years of operation. Here we discuss what to look for in socket design, the common materials used, and how these relate to durability.
Housing Design & Materials: Most relay socket bodies are made from engineering plastics. High-temperature thermoplastics like polyamide (nylon) or PBT (polybutylene terephthalate) are widely used; these materials are chosen for their insulating properties and flame retardancy (often rated to UL 94 V-0 for flame resistance). Some sockets, especially older or high-temperature ones, use thermoset phenolic resin or even ceramic for the housing, which can withstand heat (for example, ceramic bases are seen in tube sockets or very high-heat situations). The design of the housing often includes barriers or walls between terminals to increase creepage distance (important for meeting insulation requirements at high voltages). Many sockets also incorporate features to make them “finger-safe,” meaning live metal parts are recessed to prevent accidental touch, which is an aspect of design important for safety (especially in industrial environments).
The contacts (terminal inserts) are typically made of metal alloys with good conductivity and spring properties. Common base metals are brass or phosphor bronze, which provide a balance of conductivity and stiffness. These contacts are often plated – tin plating is common for general-purpose sockets, while higher-end or military-grade relay sockets might have silver or gold plating. The plating prevents corrosion (oxidation) and lowers contact resistance at the interface with the relay pin. As mentioned earlier, plating thickness and type directly affect how many insertion cycles the socket can handle before wear. For example, gold-plated contacts can endure many more mating cycles than bare or tin-plated ones because gold is more resistant to wear and does not corrode. Additionally, the metal used must maintain spring tension – each socket contact usually has a springy receptacle that grips the relay pin. Good design ensures the contact maintains pressure over time to avoid loosening (some inferior sockets may lose tension after several relay insertions/removals, leading to intermittent contact).
Physical Design Features: Durability is also enhanced by certain design features. Many sockets have an integrated retainer clip or a slot for an optional clip – using these prevents the relay from backing out under vibration or when pulled. If your application involves vibration (e.g. on a machine or in a vehicle), choose a socket with a secure relay locking mechanism. Another feature in design might be mounting flexibility; for example, some DIN rail sockets also have screw holes so they can alternatively be panel mounted if needed – this can be useful if your layout changes. The footprint of the socket is often standardized for a given relay type, but some manufacturers make slim or space-saving designs which can be important in dense control cabinets.
Look at the wire terminal design too. For screw terminals, the presence of captive backed-out screws (that don’t fall out when loosened) and clamp plates (to protect the wire from screw damage) are signs of a well-thought-out design. Spring clamp designs should allow easy insertion but also a straightforward way to release wires (like an accessible push-button). All these affect user experience and the reliability of the connection – a poorly designed terminal can lead to loose or damaged wires over time.
Environmental Durability: If the socket will be in a harsh environment, consider the ingress protection (IP rating) or sealing. While most relay sockets themselves are not sealed (since the relay is typically open to air), there are sockets available with splash-proof or dust-proof enclosures for the relay. For outdoor or washdown environments, you might use relay sockets with added covers or mount the whole assembly inside an IP-rated box. Additionally, check the operating temperature range in the socket’s datasheet. Standard plastic sockets often handle around -40°C to +70°C or +85°C. Exceeding these limits (for instance, in high-heat enclosures) can cause plastic deformation or accelerated aging. Materials like nylon can absorb moisture and lose some strength at elevated temperatures, so for high-temp needs, a ceramic or specialized high-temp polymer socket might be necessary.
Longevity and Endurance: A durable relay socket should maintain good electrical contact throughout tens of thousands of relay operations. The relay’s own lifetime might be limited by its contacts, but the socket should ideally outlive multiple relay replacements. One indicator of durability is mechanical life (mating cycles) if provided. As mentioned, high-quality sockets may be rated for hundreds of mating cycles. Also, consider the mechanical stress of the application – e.g., in a control panel that’s frequently accessed for maintenance, the sockets might see more plugging cycles. If a socket includes moving parts (like a pivoting ejector lever or LED module), ensure those are robustly built.
In summary, the best relay sockets combine international standard compliance (materials and design that meet safety standards) with thoughtful design features that enhance usability and lifespan. By selecting sockets made of high-grade insulating materials and contact metals, you ensure a strong foundation for your relay to operate reliably under the conditions required.
Key Takeaways:
– Housing materials are crucial: look for flame-retardant, insulating plastics (or ceramics) that can handle your temperature range. Good designs provide ample insulation distance and possibly finger-safe construction for safety.
– Contact quality drives durability: sockets with robust, well-plated contacts (e.g. gold or silver) will endure more relay insertions and harsh conditions than those with thin tin plating. The contacts should maintain spring tension over time for consistent connectivity.
– Design features like retention clips, proper terminal construction, and standard compliant design (UL, IEC) all contribute to a socket’s reliability. Choose a socket appropriate for the environment (consider vibration, moisture, temperature) to ensure long-term durable performance.
Interested in rugged designs? Read more about Heavy-Duty Relay Socket Construction (internal link).
Selecting the Right Relay Socket for Your Needs
With an understanding of principles, types, and specifications, we can outline how to select the ideal relay socket for a given application. Choosing the right socket is crucial — a mismatched or poor-quality socket can undermine the reliability of the relay it’s meant to support. Here are the key factors to consider during the relay socket selection process:
- Compatibility with the Relay: Begin by identifying your relay’s type and pin configuration. The socket must match exactly in pin count, pin arrangement, and physical fit. Check the relay’s datasheet or base diagram and ensure the socket is specified for that relay series or a standard that the relay conforms to. For example, if you have an 8-pin octal relay, you’ll need an 8-pin octal socket (with matching notch alignment). Sockets are often listed by the relay models they support or by standard base code. Using the wrong socket can lead to incorrect wiring or a relay that simply won’t plug in.
- Electrical Ratings: Choose a socket that meets or exceeds the voltage and current ratings required. If your relay switches high voltages (e.g. 240 VAC or 480 VAC), ensure the socket’s voltage rating is up to par (and that it has the insulation spacing to handle it). Similarly, if the relay will carry a significant load current through its contacts (say 10 A, 16 A, etc.), the socket’s terminals should be rated for equal or greater amperage. Using a socket with too low a rating can result in overheating or even tracking and arcing over time. It’s also wise to consider any surge currents (inrush) if applicable, and pick a robust socket if those are expected.
- Mounting Style and Form Factor: Select the appropriate type of socket for your design. If you’re assembling a DIN rail control cabinet, a DIN-rail mount socket for each relay is usually optimal. For a PCB project, a PCB mount socket (or deciding to solder the relay directly) is the consideration. Also, mind the available space – some sockets are low-profile, others have more height or require clearance for wiring. Ensure the socket and relay together will fit in the intended enclosure or PCB layout with any other components.
- Connection Method (Wiring): Depending on who will wire it and how often changes occur, you might prefer certain terminal styles. For instance, if you anticipate frequent rewiring or if quick assembly is needed, push-in terminals can save time. If you need to double up wires on a contact, check if the terminal can accommodate two wires or use distribution terminals externally. Also consider if you want pluggable terminals (some relay interface modules have pluggable terminal blocks separate from the relay socket for convenience). These details tie into how user-friendly the installation will be.
- Durability and Environment: Consider the environment: Will there be vibration? High temperature? Moisture or dust? For vibration, ensure the socket has a good relay retaining clip. For high temps, maybe avoid sockets with lower temperature plastics. For corrosive or humid environments, a socket with better plating (to resist corrosion) and possibly an IP-rated solution might be needed. If the application is mission-critical, investing in a higher-grade socket (from a reputable brand and perhaps with safety agency approvals) is prudent, as the cost difference is usually minor compared to the relay or downtime costs.
- Standards and Certifications: Especially in commercial or industrial settings, you may need the socket to have certain approvals (UL, cUL, CE, CCC, etc.). For instance, using a UL Recognized socket is typically required for UL compliance of a larger control panel. Check for these marks on the product. A socket that meets international standards will have been tested for things like flammability and electrical spacing, adding a layer of assurance.
- Additional Features: Decide if you need or want extra features. Some higher-end relay sockets allow inclusion of add-on modules – for example, pluggable surge suppressors or timing modules that sit between the relay and socket. Others have built-in LEDs or test buttons. If you value an indicator LED to show coil status at a glance, pick a socket or an accessory that provides that. If safety is a concern when the relay is removed, some sockets have finger-safe covers that automatically cover live terminals when the relay is out. These features can influence your choice depending on the application’s complexity and safety requirements.
By systematically reviewing these factors, you can narrow down to the optimal socket. For example, if you have a 12VDC coil, 30A automotive relay for an off-road vehicle, you’d choose an automotive relay socket with thick gauge leads, a locking latch, and perhaps a weatherproof housing. Alternatively, for a 8-pin timer relay in a control cabinet, you’d get an 8-pin DIN rail socket, likely with screw terminals and a hold-down clip, rated for at least the contact current of that timer relay (often 5–10A) and carrying UL/CE markings.
Key Takeaways:
– Match the socket to the relay in pin layout and size first – compatibility is non-negotiable for proper operation.
– Verify ratings and standards: The socket’s voltage/current specs should meet your needs with a safety margin, and certifications (UL, IEC, etc.) should align with project requirements.
– Consider usage context: Choose mounting and terminal styles that fit your installation and maintenance plans, and ensure the socket’s durability features (materials, clip, etc.) suit the environmental conditions and longevity expectations.
For more guidance, see our Relay and Socket Selection Checklist on what to consider (internal link).
Applications of Relay Sockets
Relay sockets find use across a broad range of industries and projects wherever relays are used to control electrical circuits. By providing convenience and safety, they have become a staple component in many electrical and electronic systems. Here we highlight some common applications of relay sockets and how they contribute in each context:
- Industrial Control Panels: In factories and industrial settings, control cabinets are filled with relays that operate motors, valves, lights, and other devices. Industrial relay sockets (often DIN-rail mounted) are standard here. For example, in an assembly line control system, plug-in relays on sockets control motor starters or indicator lamps. The sockets allow maintenance technicians to quickly replace a failed relay, reducing downtime. They also keep wiring organized; each socket is wired once, and the relays can be swapped out as needed. Standards compliance (UL 508, IEC 60947) is critical in such panels, so the sockets used are typically certified and robust.
- Automation Systems and PLC Interfaces: Many automation components like programmable logic controllers (PLCs) use interface relays to handle higher currents or voltages. These interface relays often come as pluggable modules with a base (socket) and the relay or optocoupler that plugs in. For instance, an interface module might have a slim socket that mounts on a DIN rail and an electromechanical relay that plugs into it, used to interface a PLC output to a larger load. Here, sockets sometimes incorporate LED indicators and protection diodes as part of the assembly. The modular nature (relay + socket) makes it easy to design and service automation racks.
- Building Electrical Systems: In commercial buildings or infrastructure, you’ll find relay sockets in elevator control systems, HVAC control boards, lighting control panels, and security systems. For example, an HVAC system might use several relays on sockets to control fans, compressors, or dampers based on thermostat inputs. The relay socket allows electricians to service these control boards without re-soldering components – a failed relay can be popped out of its socket and replaced in seconds, ensuring vital building systems stay operational.
- Automotive and Transportation: In vehicles (cars, trucks, heavy equipment), relays are used for everything from fuel pumps and headlights to wiper motors. Automotive relay sockets (with harness connectors) are used to both organize the wiring and to protect the connections. Instead of individual crimp connectors on each relay blade, a socket groups them into a single plug, often with a locking tab and sometimes a protective cover. This not only makes assembly easier on the production line but also simplifies servicing (mechanics can swap relays or rewire accessories cleanly). In off-road or emergency vehicles, you often see add-on relay boxes or harnesses that use sockets to add extra lighting or equipment controls – they provide reliable connections even under vibration and heat in an engine bay.
- Appliances and Electronics: Many household and commercial appliances contain relays for switching heaters, motors, or compressors (think washing machines, ovens, HVAC units, etc.). Some high-end appliances use small PCB-mounted relay sockets to allow quick replacement of relays on control boards. This is beneficial for appliance repair – instead of replacing an entire control board, a technician could replace a single failed relay if it’s socketed. For instance, certain furnace control boards have plug-in relays. In other cases, appliance relays are soldered directly, but socketing is used when a manufacturer expects servicing to be feasible.
- Test and Development Setups: Engineers and technicians may use relay sockets in lab or prototype setups. Having a relay in a socket on a test fixture allows easy swapping of different relay models or quick replacement if a relay fails during stress testing. Sockets might also be mounted on DIN rails in a lab for flexible circuit building. They are useful in educational settings too, where students can learn by plugging relays in and out of circuits safely.
In all these applications, the underlying theme is that relay sockets provide flexibility, serviceability, and reliability. They ensure that the connections to the relay are secure during operation but also easily separable for replacement. This is why they are found in so many places – from heavy industrial machines to the fuse box of your car. By selecting the appropriate socket for the environment (as discussed in the selection section), engineers integrate a small component that greatly enhances the maintainability of the system.
It’s worth noting that while relay sockets are mostly used with traditional electromechanical relays, some solid-state relays (SSR) also come in plug-in forms with sockets (though many SSRs are PCB or panel mounted). Additionally, time-delay relays, monitoring relays, and similar devices often use the same socket formats as standard relays. This interoperability means a single socket design can sometimes host different devices (for example, an 11-pin socket might hold either an 11-pin general-purpose relay, an analog timer relay, or a small monitoring device, depending on needs).
Key Takeaways:
– Relay sockets are utilized in industrial and commercial control systems to allow quick maintenance of relays in critical operations (manufacturing lines, building automation, etc.).
– They are common in automotive wiring and aftermarket modifications, ensuring reliable connections under the hood and easy swapping of relays.
– From appliances to lab setups, any scenario that benefits from easier relay replacement or modular design is likely to employ relay sockets for improved functionality and serviceability.
Learn more about Specific Use-Cases of Relay Sockets in different industries (internal link).
FAQ
Q: What is a relay socket and how does it work?
A: A relay socket is a connector base used to mount and connect a relay. It typically has metal contacts that correspond to each pin of the relay. When you plug the relay into the socket, those contacts make the electrical connection between the relay and the circuit wiring. Essentially, the relay socket holds the relay in place and interfaces it with wires or a PCB, allowing the relay to be easily installed or replaced without soldering. The working principle is purely mechanical and electrical connectivity – the socket doesn’t alter the relay’s function; it simply provides a convenient, secure way to link the relay’s coil and contacts to the rest of the system (and often secures the relay with clips or a locking mechanism for stability).
Q: How do I select the right relay socket for my relay?
A: Relay socket selection comes down to matching the socket to your relay and application requirements. First, identify your relay’s pin configuration and choose a socket that fits that layout (e.g. 5-pin, 8-pin, 11-pin, etc., in the correct arrangement). Ensure the socket’s voltage and current ratings meet or exceed what your relay and circuit will carry (for safety, a higher rating is better). Pick the appropriate mounting style – DIN rail sockets for control panels, PCB sockets for circuit boards, panel-mount or harness sockets for standalone use. Consider the terminal type that suits your wiring: screw terminals vs. push-in vs. solder pins, etc. Check for any needed approvals (UL, IEC) especially for industrial use. Also think about environmental factors: if there’s vibration, use a socket with a retaining clip; if high temperature, ensure the socket material can handle it. In short, match the physical compatibility, electrical specs, and features of the socket to the relay and the operating conditions for a reliable fit.
Q: What are the different types of relay sockets available?
A: Relay sockets can be categorized by their mounting method and design. Common types include: DIN rail mount sockets, which snap onto standard rails in control cabinets (widely used in industrial settings); panel-mount sockets, which screw onto a panel or enclosure for a fixed installation; PCB mount sockets, which have pins to be soldered onto printed circuit boards (used in electronics and appliances); and plug-in harness or automotive sockets, which come with wire leads or connector housings for use in vehicles or wiring looms. They also differ by the pin configuration they support – for example, 8-pin octal sockets for many general-purpose relays, 11-pin sockets for some relays and timers, 5-pin sockets for automotive relays, etc. Additionally, sockets vary by terminal style: some have screw clamp terminals for attaching wires, others have quick-connect blades or spring terminals. The variety of types ensures there’s a suitable socket for nearly any relay and application, whether it’s a tiny PCB relay on a circuit board or a large industrial relay in a factory panel.
Conclusion: Relay sockets may seem like simple accessories, but they play an indispensable role in ensuring reliable and maintainable connections for relays across countless electrical applications. By understanding the principles, types, specifications, and installation methods of these sockets, you can select and use them with confidence, enhancing the safety and serviceability of your designs. Whether you’re wiring a complex industrial control system or adding aftermarket accessories to a vehicle, using the right relay socket will save time and prevent headaches down the line. Always consider the standards compliance, design features, and quality of the socket as much as you do the relay itself – a well-chosen socket ensures your relay functions to its fullest potential over a long life.
At Zhejiang Chuangdao Electric Co., LTD, we offer a wide range of high-quality relay sockets and accessories that meet international standards and suit various applications. Our sockets are designed for durability, featuring robust materials and user-friendly designs to make your projects successful. Contact us today to find the perfect relay socket solution for your needs, or explore our catalog to learn more about how our products can help you build reliable, efficient systems. Let us assist you in making the best choice so your relays – and your projects – always have a solid foundation.
